
Printing With PHA for Coral Restoration
- nicolas gonzalez
- Feb 10
- 4 min read


Printing With PHA for Coral Restoration
A practical, reef‑first playbook for coral mimics and biodegradable 3D‑printed tools
Coral restoration needs physical tools — but the ocean doesn’t need more plastic.
Over the last year, I’ve been experimenting with PHA biopolymer filament, specifically ColorFabb PHA, to create coral mimics and reef‑support tools that are functional, temporary, and designed to disappear over time. This post is a step‑by‑step playbook so other reef practitioners, marine scientists, and restoration nerds can do the same — safely, intentionally, and with documentation that actually means something.
This is not about printing toys for the ocean. It’s about engineering temporary structure, understanding material behavior, and treating every deployment like a small scientific study.

Start with the use case: the coral mimic
A coral mimic is a 3D‑printed object designed to provide temporary structure or function on a degraded reef. That might mean:
adding short‑term habitat complexity
acting as a coral fragment mount
serving as a settlement or recruitment surface
stabilizing rubble while biology reclaims the space
The key word is temporary. If a printed object is meant to last forever, it probably doesn’t belong on a reef.
Before opening your slicer, define what the object needs to do and how long it should realistically exist in the field. Weeks? Months? Just long enough for coral tissue to take hold? That answer should drive every design and print decision that follows.
Why ColorFabb PHA (and why we recommend it)
For reef work, I use ColorFabb PHA and recommend it specifically for biopolymer experimentation in marine environments.
PHA is fundamentally different from PLA or PETG. It is biologically produced, marine‑biodegradable, and does not fragment into persistent microplastics the way conventional filaments do. ColorFabb’s formulation is consistent, printable, and well‑documented — which matters when you’re trying to correlate print settings with real‑world degradation behavior.
If you’re going to test biodegradable materials in the ocean, consistency matters more than novelty. ColorFabb PHA gives you that baseline.

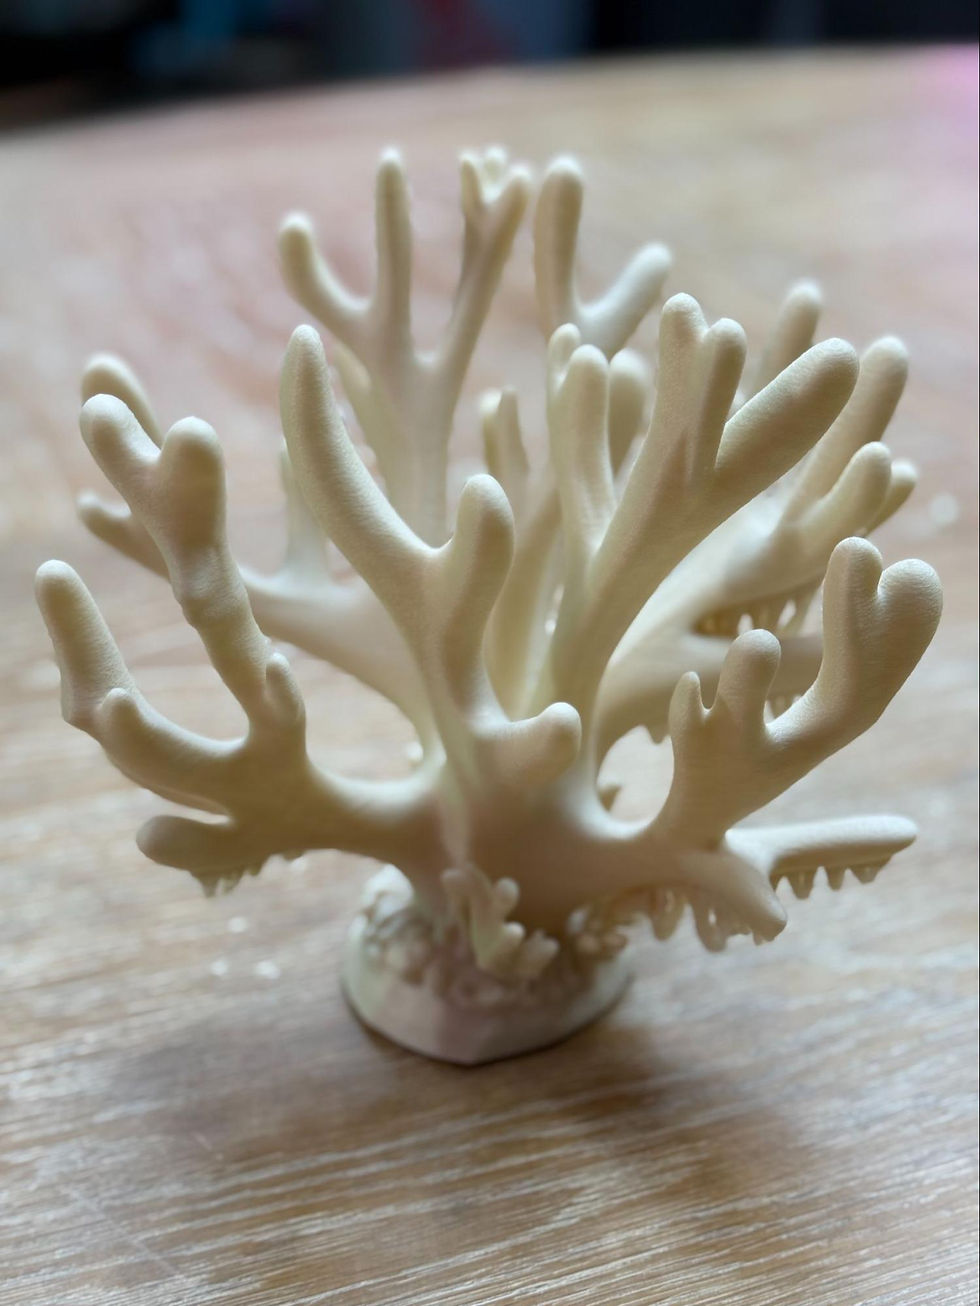
Designing coral mimics that actually work
Good coral mimic design prioritizes water flow, stability, and stress reduction.
Open lattices, branching forms with rounded transitions, and gently curved surfaces perform better than dense blocks or sharp geometries. Avoid sediment traps and thin stress points. If something looks fragile in your hand, it will not survive waves, handling, or deployment.
Design attachment features directly into the model: holes, slots, or channels for ties or clips. Relying on adhesives or mixed materials defeats the point of using PHA in the first place.
Handling and storing PHA (don’t skip this)
PHA is sensitive to moisture. If your prints suddenly look foamy, weak, or inconsistent, moisture is usually the culprit.
Store ColorFabb PHA in a sealed container with desiccant. Treat reef‑bound prints like lab samples — clean hands, no shop dust, no mystery sprays, no post‑processing chemicals you wouldn’t want near coral tissue.
If it might go in the ocean, assume someone else will inspect your choices later.
Bambu Studio: a practical setup approach
Start with a conservative baseline. I typically begin with a PLA‑style profile in Bambu Studio and tune from there, one variable at a time.
The order matters:
Dial in nozzle temperature for clean, consistent extrusion
Lock in bed temperature for first‑layer reliability
Slow down first‑layer speed
Adjust cooling to support layer bonding
Only then start tuning structure for strength or degradation
PHA doesn’t reward aggressive speeds. Accuracy, bonding, and repeatability matter far more than shaving minutes off a print.

Bed temperature and adhesion strategy
Your first layer determines whether a print survives long enough to matter.
Use the lowest bed temperature that still produces a smooth, fully bonded first layer without edge lift. Keep plates clean and avoid heavy adhesives if possible — especially for reef‑bound parts.
Pro tip: High‑adhesion or cryo‑style plates can dramatically improve first‑layer grip for coral mimics with wide or complex bases. Fewer failed prints means more consistent data and fewer wasted spools.

Walls and infill: controlling how PHA disappears
This is where things get interesting.
In the ocean, degradation isn’t just chemistry — it’s access. Water, microbes, abrasion, and UV need pathways. Your print settings create or restrict those pathways.
Wall count controls shell life
More wall layers create a thicker outer shell. This usually means:
better handling strength
delayed internal exposure
longer shape retention
Fewer walls allow earlier breach, faster softening, and quicker loss of structure.
Infill controls internal exposure and collapse
Higher infill gives the object more material “reserve” and structural inertia. Lower infill increases water access and speeds functional breakdown once the shell weakens.
Infill pattern matters
Open, channel‑like patterns allow water to move through the interior more easily than dense, closed patterns. Choose patterns intentionally based on how long you want the object to function.
Think of walls and infill as a decomposition throttle, not just strength settings.
Below is what your slice should look like at 10% infill

Here is what your inner (gyroid) infill should look like

The 10% infill with 2 wall layers could propose on degradation schedule while a different fill/wall combination could either extend its life or reduce it, depending on the scenario in which you are in.
Matching print strategy to restoration intent
If the goal is short‑term habitat or experimental structure, favor lighter builds with open geometry.
If the goal is weeks‑to‑months of support, balance wall count and infill so the object stays intact long enough to matter but doesn’t linger indefinitely.
For utility parts (clips, tags, holders), increase robustness — but still document everything. Even these should eventually leave no trace.
Test before the ocean (always)
Before field deployment, do simple, repeatable tests:
flex and twist by hand
controlled drop tests
soak tests in aerated saltwater
timed photo and weight documentation
A bucket test will tell you more than speculation ever will.
Field deployment: treat it like science
Deploy small batches. Label or encode objects so you can tie field performance back to print settings. Track survival, stability, biological interaction, and degradation timeline.
Even biodegradable materials deserve a retrieval plan. If something fails early or behaves unexpectedly, pull it, document it, and revise.
That’s how this work stays credible.
Final thought
PHA gives us something rare in reef restoration: permission to experiment without leaving permanent scars. But that permission only holds if we act responsibly, document rigorously, and share what works and what fails.
If you’re going to put something in the ocean, make it count — and make it disappear.
Comments